Push your billable users in Phin to your ConnectWise Manage account for billing and reporting!
Enable the ConnectWise Manage Billing Integration
This Phin integration pushes billable users from Phin to your ConnectWise Manage account for billing and reporting.
⚠️ It is important that you have created the necessary Security Role and API Member and accurately configured the permissions necessary for the ConnectWise Manage Billing integration before enabling this integration feature. If you have yet to do so, please refer to the ConnectWise Manage connection document.
Permissions Necessary for the ConnectWise Billing Integration
- Companies - Company Maintenance: Inquire Level (All), Manage Attachments: Add Level(All), Inquire Level (All)
- Finance - Agreements: Inquiry Level, Agreements: Edit Level
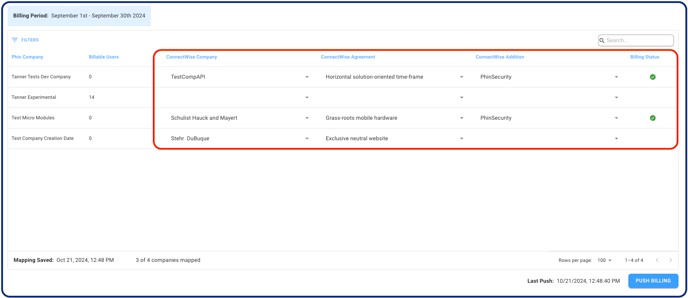
Mapping Phin Companies to ConnectWise Companies
Once you've connected Phin to ConnectWise Manage, you'll be able to enable the billing integration, which will give you access to map your Phin companies to your ConnectWise companies. The mapping between the billing and service desk integration is shared, so you will NOT need to map both individually. Map these companies using the available ConnectWise fields (below).- ConnectWise Company
- ConnectWise Agreement
- ConnectWise Addition

There are two ways to map company names: Auto-Map or Manual mapping.
Auto-Map
When you click "Auto-Map," the button will turn grey, disabling itself from being clicked again, and the integration will attempt to find exact matches between your Phin company names and company names in your ConnectWise Manage account. The "Auto-Map" button is to the right of the "Filters" button. Depending on how many companies you have, this process can take up to a minute. You will know the process is over when you see the "ConnectWise Company" column populate with company names, and the Auto-Map button will no longer be disabled. 
- Differences in name capitalization between platforms
- Extra spaces between names (for example, Phin Security has 1 space between words, but in ConnectWise, Phin Security has 2 spaces between words)
- You've previously mapped names manually, in which case we do not override the existing mapping value.
- The integration failed, at which point we suggest re-running the automap feature. If it still doesn't work, either manually map missing company names or contact the Phin support team.
Manual Mapping
If your company naming convention in ConnectWise Manage is different from the one you use in Phin, manual mapping is the tool for you. Just select a company from the dropdown field in the ConnectWise Company column or start typing the company name, and Phin will attempt to find it for you.
🚧 If you manually map company names for some rows and then choose to auto-map, your manually mapped company names will not be overridden. You must remove company names from the ConnectWise Company column in order for auto-map to update the column fields.
When a selection is made, the mapping is saved automatically. The "Mapping Saved" date is in the bottom left corner of the table.
Agreements and Additions
The mapping of the "ConnectWise Agreement" and "ConnectWise Addition" columns is currently completely manual.
If you do not have a Phin Security product made already, you will need to create this in ConnectWise. This may affect the Addition that you select.
Push Phin Data to ConnectWise
Pushing to ConnectWise is done manually and can be done anytime during the month. When you select "Push Billing" in the bottom right of the screen, the Billable Users from the defined Billing Period will be sent to ConnectWise for the corresponding Company, Agreement, and Addition.
🚧 Billing data will not be pushed to ConnectWise Manage for the rows in the mapper where an agreement and/or addition is not selected for a company record.
After the syncing is complete, there will be an updated Billing Status per Phin Company record. A green check (✅) indicates a successful sync, and a red x (❌) indicates an unsuccessful sync. If a second attempt does not work, unsuccessful syncs might need to be resolved within your ConnectWise Manage account. The "Last Push" date to the left of the "Push Billing" button represents the last time billing data was pushed from Phin to ConnectWise.
Knowledge Base
Phin works to update our Knowledge Base with new features with every release. You can read about the platform and its updates here: https://www.phinsec.io/knowledge.
Thanks for using our product!
We use all provided feedback to help drive Phin's development direction. Please keep reaching out and helping us shape the product's future! All ideas are welcome; please keep them coming!
The Dev Team @ Phin
Need help or have an idea for us? Click here!